Showing posts with label JEWELLERY. Show all posts

Saturday, 30 April 2016

It’s so simple and addicting, you’ll soon be churning out these wristlets with your eyes closed. Clearly this arm party train isn’t stopping and it’s about time you get on board!

You’ll need (for a double wrapped bracelet) :

* Lengths will vary depending on the size of your wrist 
Fold the length of leather cording in half to form a loop. The loop should fit around the hex nut, which serves as the clasp. Run the tip of the waxed linen upwards along the leather cord and towards the loop. Then wrap around the base of the loop at least 5-6 times, working downwards in the opposite direction. This secures the waxed linen cord and is the start of the bracelet.
Place the ball chain along the leather cording with the end of the chain meeting the end of the wrap. Holding the ball chain against the leather cord, wrap the linen around tightly.
Continue wrapping while checking it for fit around the wrist.
When you have reached the end of the ball chain wrap the linen cording around the leather strands 2-3 more times. Tie a knot with all three strands.
Thread the hex nut through the strands and tie a second knot.
Trim with scissors and your wrap bracelet is finished!!
The materials are listed for a double wrap bracelet. For a single or triple wrapped bracelet, divide the measurements by 2 and multiply by accordingly. Experiment with crystal or other types of chain!
Happy Crafting!

DIY Double Wrapped Bracelets

This transformation was easily executed with supplies already laying around in my craft closet.

You’ll need: 

  • a variety of embroidery floss 
  • several 6mm and 7mm jump rings  
  •  glue
  • a toothpick 
  • scissors


Start by applying a small amount of glue to the tip of a toothpick. Place a drop of glue onto one area of the bangle.

Place the end of the embroidery floss on the glue and start wrapping tightly around the bangle.

Once you’ve wrapped past the glued section, you don’t need to pay attention to wrapping so precisely. Instead, wrap a generous amount around the bangle and then use your fingers to push the section together.

Continue wrapping until you’ve reached the end. Add a dab of glue onto the bangle and finish wrapping.

Using two pairs of pliers, start attaching jump rings and charms.

One down, more to go.

Have fun with this . . .


. . . the more charms and colors, the better!
Happy Crafting!

DIY Cute Wrap Bangles

Friday, 29 April 2016

Because of my love for the chevron pattern I decided to make a chevron friendship bracelet. I also added a metal toggle closure clasp. I love to be able to take the bracelets of easily. It also makes the bracelet a little more sophisticated. I absolutely love how it turned out!


What you need:
– cotton yarn in five different shades, you can use more or less colors. If you use less colors you might want to add more strings of cotton of one color. The more strings, the wider your bracelet.
– toggle clasp closure
– two fold over clamps
– jewelry pliers
– a small piece of chain
– three small jump rings
– tape
– scissors
How to make it:
1. Choose your colors of cotton yarn. I used five different colors for my bracelet. You could use more or less colors if you want to. The more strings you have the wider your bracelet will be. So if you want to use just two colors you have to use more strings of each color to make the bracelet wide enough. Cut from each color a string of about a meter long.
2. Make a knot in the middle of the string wit a loop above it. Tape this to the floor or a table. Arrange your strings beginning en ending with the same color. In the middle you will have the same color next to each other.


3. Make a knot with the string most left over the string on the right next to it. Make another knot with the same thread over the string right next to that one until you reach the middle of the bracelet. You will know have made a knot over all of the strings on the left side.
4. Do the same on the right side.


5. Make a knot with both of the strings you just used to make all of the knots. Now you have to start with step 2 again with the color who is now on the most left and the most right. Repeat this knotting until your bracelet is long enough to almost fit your arm. You can leave it a little shorter because of the clasp and chain you will attach to it.
6. Cut of the ends in a strait line.


7. Use your jewelry pliers to attach the fold over clamps on both sides.
8. Attach your chain and clasp. The round piece can be attached directly to the clamps. Between the other piece and the clamp you need a little bit of chain. Other wise you will not be able to close the clasp.
9. Your new chevron friendship bracelet is ready to wear! 

Happy Crafting!

DIY Chevron Patterned Friendship Bracelet

Wednesday, 27 April 2016

What you need:

  • Old piece of fabric
  • CD Plates
  • Fabric glue

How to make it:
  • Cut out the fabric into a bib shape.
  • Cut out a thin fabric to be used as chain.
  • Cut out old CDs in any pattern of your choice.
  • Use fabric glue to glue them to the fabric.

Pretty right? I hope this inspires you!
Happy Crafting!

DIY Bib Necklace

Monday, 25 April 2016

Statement necklace has been a huge trend for a while now and everybody gets to wear them as they can transform a plain outfit into something sparkly and special, but they can be pricey too.
If you are fans of home made jewellery like me,this idea will inspire you.
Materials needed:
  • Flat jewellery pliers.
  • 25cm piece of CHAIN with wide links.
  • 25cm piece of CHAIN with medium links (cut into two pieces)
  • A tube of glue.
  • A large lobster clamp with a jump-ring.
  • 3pcs. of 7mm jump-rings.
  • A ribbon 100cm in your desired colour.
  • Wire cutters or scissors to cut fabric strip.
Steps:
  1. First, glue the end of the ribbon to the end of the link of the large chain. Then start wrapping the ribbon around the CHAIN links on one side and along the entire length. If you are not sure how to do it, try it first without the glue.
2. Glue at the other end when finished wrapping. Let dry.
3. Connect the medium CHAIN on both sides of the large chain by using the jump-rings. Use the pliers to open and close them properly.
4. Apply the lobster clasp and the last jump-ring to secure the necklace.
Your necklace is now finished, you can add a second ribbon to add colour or experiment with different patterns.
Happy Crafting!

DIY Statement Necklace

Sunday, 24 April 2016


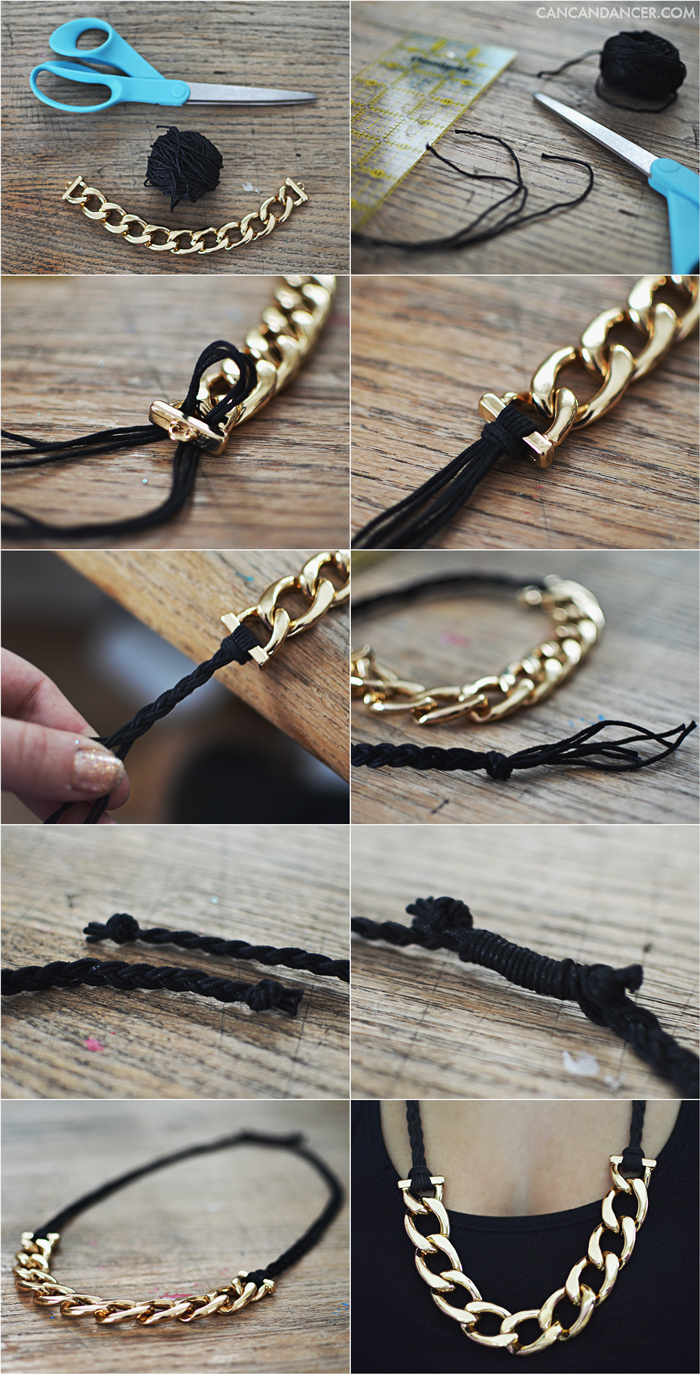
When I go shopping, I don’t just look for items I can wear as is. I look through for items that I can repurpose, update, or easily fix.
Last week, I found a heavy gold chain bracelet, the only problem was it was way too big for my wrist. I simply removed the lobster clasp and repurposed the chain to make a necklace.
braidnecklace1
1. Gather your supplies: chain, jewelry cord, scissors, and a ruler.
2. Cut six strands of jewelry cord. I made each of my cords 34 inches long.
3. Fold three of the cords in half and feed these loops through one end of your chain.
4. Bring the tail ends of the cords through the cord loop and pull tightly.
5. Due to the loop, you will have 6 pieces of cord to work with. You can either braid two small braids, or one thicker braid.
6. Tie a knot at the end and repeat this process for the other side of your necklace.
7. Trim the tail ends of your braids.
8. Wrap some jewelry cord around both braids, and tie knots to secure it. If you are worried about it coming undone, add some glue to secure it.
Happy Crafting!

DIY Chain Necklace

 
DIY Outfits © 2015 - Designed by Templateism.com | Distributed By Blogger Templates