Showing posts with label OUTFITS. Show all posts

Tuesday, 10 May 2016

Grab a handful of sparkle and let’s get gilding!

You’ll need:

For shank style buttons, start by cutting off the backs with a pair of flush cutters. Vintage buttons are most commonly made of lightweight metal and plastic so cutting off the shanks is very easy. For embellished collars, make sure there are two sets of embellishments so that the design is symmetrical.
Squeeze a dollop of Jewel-It washable glue onto a wooden spoon or small plastic container. Jewel-It is the best bonding agent when it comes to glueing hard-to-hold jewels and embellishments onto fabrics. Use a toothpick to dab glue onto the back of a button, rhinestone, or pearl.
Position the embellishment on the tip of the collar and work outwards
Note that the glue does not set right away and takes quite a while to dry so be careful not to nudge the pieces around too much.
Repeat the same design on the other collar tip and that’s it, you’re done! Allow to dry at least 24 hours before handling or wearing and even though clothing can be washed after using Jewel-It, I would recommend dry cleaning the shirt only.
Another option is to embellish the pocket of a denim shirt using the same technique. Happy embellishing!
Happy Crafting!

DIY Embellished Denim Shirt Collar

Monday, 2 May 2016

I mean, does it get any easier than gluing gemstones onto a pair of shoes?! This one is a must do, y’all!

You’ll need:

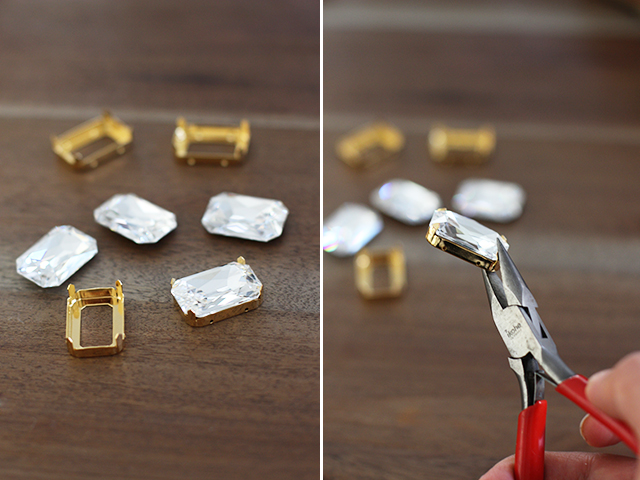
Place the crystals in their settings. Use pliers to close the prongs to secure the crystals.
Squeeze a large dollop of glue onto the backside of the crystal, without getting any glue onto the setting. This will ensure that you won’t get any glue seeping out from the sides.
If the stone slides, use a large binder clip to keep it in place until it the glue sets. Finish adding the rest of the crystals and allow to dry overnight.
Happy Crafting!

DIY Jewelled Sandal

Saturday, 30 April 2016

 I dare you to do this tutorial and resist the urge to give another accessory the fringe treatment. Because honestly, everything is better with fringe.

You’ll need:


Start by finding an unlined leather pouch. If the pouch or clutch is lined with fabric, it will be very hard to punch holes using your rotary punch. Turn the pouch inside out. Using a fine, white paint pen, draw a straight line a few millimeters above the bottom seam. Do the same with left and right seam. It’s okay if the lines don’t intersect at the corners.
Make dotted marks every half inch along the drawn lines. Use the second largest hole size, 13/64″, and punch holes through the marks.
Punch one hole in two bottom corners.
Cut 17-18″ inch strands of leather lace. Take one strand and thread it through the front face of one set of holes. The glossy side of the leather lacing should be facing out.
Bring the other side of the strand over the edge of the pouch and through the hole on the back face. Pull both ends from the inside of the pouch. Repeat with all the holes.
Turn the pouch right side out and adjust the strands so the ends match.
While keeping the strands sandwiched together, tie a knot and tighten close to the edge of the pouch. Repeat on all the strands.
And you are done!
Happy Crafting!

DIY Leather Fringe Clutch

Tuesday, 26 April 2016

This is a really cute and fun way to upcycle an old sandal heel.


Easy brezzy! I hope this inspires you.
Happy Crafting!

DIY Fringes Heels


I’m so in love with this cute animal purse! Because this is a small shoulder bag I decided that it would be perfect as a purse. The cute part will be that it will have the face of a really cute animal! I’m not quite sure which kind of animal it has become (maybe a squirrel?) but I’m open to suggestions!

What you need:
– thrifted purse
– fabric glue
– thrifted lace curtain
– small piece of white fabric
– scissors
– utility knife
– pencil
– Cropodile
– white cotton thread
How to:
1. Lay down your shoulder bag and remove the belt. Removed the hardware on one side. Because this is going to be a purse you only need one side.
2. Make a pattern for the face of your cute animal. You can do this by folding a piece of paper with the same width as your bag (or a little smaller like mine) and cut out the shape of one side of the head. Trace this with a pencil on your bag. Cut out.

3. Cut out a piece of lace curtain that is more than big enough for the piece of your purse directly below the piece you just cut out. Use the seam of the lace curtain at the top. Use something round as a guide to trace around to create the eyes. Cut the eyes out. You may also cut out a piece for the button if you have one.


4. Use fabric glue and put it on the bag where the lace curtain is coming. Only glue on the sides and around the button. Put glue on the lace around the eyes. Place the lace on your bag and let the glue dry. You don’t need more glue than this, this will keep everything in place. When the glue is dry you can cut the excess of the lace curtain. You also need to cut out two small circles out of the white fabric to finish the eyes. Glue those down as well.

5. Take the pieces of leather that you cut out of the bag. Draw a ear on one of them and cut it out. Now use that ear as a guide to cut the other one.

6. Make  two cuts in the size of the ears at the top of your bag. Put the ears trough the holes from the inside out leaving about 1/3 of an inch inside the bag. Glue this down. You also need to cut a little nose out of the scraps and glue that down.

7. Now you need to make the strap. You can use the old strap for this and cut it off at the desired length. I used the seem of my lace curtain to glue on one side of the strap to make it match my purse. After that I made two holes on both sides of the strap with my Cropodile. you can now sew around the hardware of the bag and through the holes of the strap to keep the strap in place.


That’s it. Wear you new DIY cute animal purse with pride!
Happy Crafting!

DIY Cute Animal Purse

We all have that one plain old dress that's out of fashion or overly worn.
Here's a DIY (do it yourself) inspiration to help recreate and make it stylish for you.
What you need:

  • Brooch
  • A ribbon, about 4 inches wide or a belt which ever one you choose
  • A lacy material or any material of your choice
  • Threaded needle
How to:
Divide material in two equal sides,use your threaded needle to stitch the end of each sides of the both halves together.

Take the stitched part lay it on one part of your shoulder 

Use your ribbon or belt to put the draped garment in place as it may seem bulky.

Add your brooch to the stitched part.

Happy Crafting!

DIY Recreate An Old Dress

Got a boring dress? Glam it up with gold chains.
Happy Crafting!

DIY Dress Idea

Monday, 25 April 2016

Flip flops are the best choice for foot wears for the warm summer months. They are easy to slip on, comes in varieties of colours and can match almost any outfit.
Instead of searching for hours for the best pair, you can spend less and have them made stylishly and unique to your taste.
Check out these DIY Flip Flop Projects:


Happy Crafting!

DIY Flip-flops Ideas- How To Embellish Your Slip-ons With Beads

 
DIY Outfits © 2015 - Designed by Templateism.com | Distributed By Blogger Templates